Friday 29 December 2017

Tents, Tarps and Shelters ... but, which one is best??

Last week I wrote about our little canoe trip and camp on the river Usk and since then I have had a few questions about the kit that we used ... and even more ribbing from those who know me better as I am a pretty determined hammock-camper (in fact, I even produced and sold 'Spotty Dog Hammocks') yet here we were, sleeping on the frozen ground underneath only half of a tent each!


This mickey-taking has prompted me to write this Blog entry in order compare the different methods of camping that I use on personal and professional trips ... and perhaps encourage you to try some of them!

The Mountain Tent:

Most usually I take a tent when undertaking multi-day expeditions in the mountains (although I have been known to go lighter-weight when the craziness takes me) and my 'go to' tent is my Mountain Equipment Dragonfly that is about ten years old and simply refuses to die. The Dragonfly is a 2-person, semi-geodesic, twin layer design that weighs in at roughly 2 kilograms. It has been a solid and reliable tent for me, In fact, the only drawback I can think of with the tent is that the porch is a bit tricky to get in and out of due to the position of the single zip on the left hand side of the opening. I have used it with a second person and had no real complaints, even with our rucksacks wedged between us and out of the weather! Mostly though I use it as a bit of a luxury space as a solo tent.


Pros

This tent, and many others just like it, have served me well all over the world and in different weathers and seasons. The tent is obviously an entirely closed in experience and provides full protection from the wind, rain, midges as well as privacy from other people. It is great to be able to lay kit and clothing out inside the tent, to be able to strip off and wash at the end of the day and there have been numerous occasions in which I have laid wrapped up in my sleeping bag as winds have shaken the tent, threatening to pull it from the ground; as lightning has lit the sky and tent as if it was daylight at 3am; as snow has fallen and rain has caused the streams to burst their banks.

I chose a tent with a high 'hydrostatic head' (which is essentially its water resistance) and camping, even on boggy ground, has always been a dry affair ... well, most usually a dry affair!! The outer 'flysheet' is sewn to the inner so the tent pitches as one which makes it a very swift affair, especially in poor weather and there are three vents spaced around the tent, as well as the main door and porch, which is very effective at preventing condensation building up.

The guylines and piping on the tent seams are reflective and the zip toggles are glow in the dark which are both really useful features ... in fact, these two subtle features have been a huge boost to my morale and spirit more than once when returning from night navigation in really terrible winter weather and in poor visibility when the light from our headtorches caught the guylines making the tent suddenly appear in front of us out of the gloom; all the other tents were basically invisible to us until we tripped over them! 

The inner tent has four large 'dump' pockets sewn into the inner tent and has four clips sewn into the ceiling to attach a fabric 'gear attic', sadly this didn't come with the tent as standard and, although I think about how useful the gear loft would be every single time I lie in the tent, it's not been a big enough loss for me to actually go and buy one!


Cons

I really like my tent and I would only change it for a Terra Nova Laser which has a much bigger porch opening for the same sort of size and weight. There isn't much wrong with tent camping, especially if you have invested in a decent technical product in the first place but there a couple of obvious and more subtle issues to bear in mind.

There is a limited amount of space within the tent and the porch and it can be hard to store rucksacks out of the weather whilst also having space to organise and store kit, have space to 'live' cook and be able to get in and out of the tent without upsetting the whole affair. The space available to you is generally low and long and it is difficult to change your trousers without becoming a contortionist; washing without wetting your floor or sleeping bag is also a bit of an artform.

My particular tent is a pain to climb out of, especially with two in the tent and a porch full of kit; a wee-bottle is a very useful item to have with you to prevent any middle-of-the-night trips outside the tent (although this will also take your relationship with your tent-mate to a whole new level!).

I bought wisely, and not cheaply, and my tent is pretty waterproof but I find two issues still occur that jeopardise the dryness and effectiveness of my sleeping bag on multi-day trips.

     Firstly, I find there is condensation underneath my sleeping mat and any bags or rucksacks heavy enough to press against the floor of the tent. Some of this is condensation and some of it is the tent tub getting older and less waterproof but it is an issue that requires the tent ventilating / airing every few days to resolve. To help prevent this I bought the 'footprint' for the tent which is just a groundsheet that matches the shape of the tent and goes between the floor and the tent tub to prevent the water passing through.

     Secondly, I find that as soon as the tent has to be put away wet or in the rain then the tent (not just this one but any tent really) is effectively soaking wet for the remainder of the trip. To help mitigate this I have given up on the original tent bag and instead roll the wet tent up into a sealable Exped drybag that then goes into my rucksack. I also now use a bivvy bag as a matter of habit to try to protect my down sleeping bag. My sleeping bag is also stuffed into its own Exped drybag before going into my rucksack. There are tents that pitch with inner tent first and then the outer flysheet separately and by packing the outer separately the wetness may be limited, unless it happens to be raining at the time of striking camp or re-pitching and then wetness abounds!

My final dislike of camping wasn't really apparent until I moved to hammocking but ... it just isn't as comfortable sleeping on the floor! I use a good quality inflatable sleeping mat and a very lightweight bivvy RAB bag which, together with my down or synthetic sleeping bags, is always warm enough ... I am just never that comfortable sleeping on the floor!


The Hammock and Tarp:

I cannot remember where I first saw or bought a hammock but I do remember that as soon as I tried sleeping in one it was clear ... a bad night in a hammock is much better than a good night in a tent!

I now own a number of makes and styles of hammock (some bought and some home-made) and it has taken me a fair amount of time to decide on the length, style and suspension method that I'm happiest with. The same is true about finding my most favourite tarp size and shape but it has been a fantastic journey filled with lazy afternoons in the woodlands to find these things out!


Right now my personal hammock kit consists of either a Simply Light Designs ACU (American military camouflage) 11ft Hammock or my own Spotty Dog 11ft ripstop nylon hammock together with a UK Hammocks full length down underquilt and either a Tenth Wonder Tarp (as in these photo's) or a Tatonka 4x3m Polycotton Tarp over the top if it's windy or rainy. I am a softy and quite like something to snuggle under so I usually take a fleece blanket or a down quilt for inside the hammock too.


There is way to much information to cover about hammock camping and the different choices about equipment and suspension methods to cover in this (already quite long Blog) so I will leave that for now, other than providing the following links if you can't wait until the next Blog to find out more:

hammockforums.net - elevate your perspective


Pros

I love absolutely EVERY single thing about hammock camping. As soon as the tarp is pitched you have a sheltered (from rain or sun) area in which to sort and unpack kit which in turn gives the time to carefully pitch the rest of the equipment in poor weather without it all being exposed to the rain. I usually keep my tarp in an Exped drybag but often just leave it rolled up on the outside of my rucksack or inside the canoe as it just doesn't matter if it gets wet; the water runs off the tarp as soon as it is up and any wind helps to dry it off in super quick time!

As soon as the hammock is rigged beneath the tarp I have somewhere to organise my clothing and am able to stand up, sheltered from view by adjusting the angle of the tarp, where I can change, wash and sort myself with all the space I need. I can sit in the hammock as a very comfortable seat, sofa for two or chaise longue from which I can comfortably reach to cook on the ground, or sit and chat, read a book or drink beer while watching the world go by!


By using a down underquilt, or in warmer weather just a separate piece of ripstop nylon hung underneath (but right next to the hammock) the wind doesn't rob me of any warmth and I can combine the bottom quilt with a fleece blanket, quilt or sleeping bag on top of the hammock according to the season and temperatures. I have hammock camped in the middle of winter, in the snow and sub-zero temperatures and its been so warm that I've never needed to wear anything in bed!

In my humble opinion a gathered-end hammock of 11 or 12 feet in length is absolutely the best to have as provides enough material for you to lay horizontally across the centre-line giving an absolutely flat lay and allowing you to toss, turn, sleep on your front, your back or your side!


Perhaps the best thing about the hammock camping experience is being able to see all around you from in your bed. By altering the angle of the tarp, or removing it (partially or completely) in dry weather, you can create the perfect balance of protection and view. I have lain snuggled into my warm down paradise, swinging gently from side to side, and watched a fox and her cubs exploring in the dusklight as well as too many sunsets and sunrises to recount. I have lain in the warmth and dry while heaving rain has fallen all around me, feeling so much more in touch with nature than in any other camping set up.


I have set hammocks up for the night off bridges, telegraph poles and streetlamps, between two Land Rover Defenders, using rock climbing anchors, from playground frames, underground in caves, and, of course, between two trees. They are just so versatile and so adaptable ... and so supremely comfortable!

Cons

I am so fond of hammock camping that I have to work hard to recognise the 'cons' and be honest about them.

When suspended, the tarp and hammock lie parallel to each other, with one below the other, and this can cause a wind tunnel effect if you don't plan ahead when pitching them ... or if the wind changes during the night. This can be mitigated by choosing your anchor points carefully, choosing a sheltered campsite or by using an oversize tarp which allows the end corners to be drawn together and each end of the hammock creating a closed-in 'winter palace' during storms. Just as easily the tarp can be lifted by using sticks, walking poles or canoe paddles to create a 'porch'. Wow, this feels like a 'pro' really!!

There is the tiniest chance of the hammock or its suspension failing during the night and an even slimmer chance of you falling out of bed but this is easily managed by using reliable equipment and knots, choosing your trees carefully (including looking above you for any deadwood or branches that may blow down onto you during the night ... and finding a suitably clear place to camp, obviously ... and by only hanging your hammock as high as you are willing to fall. I have developed the habit of putting my rucksack / drybag / boots etc underneath my hammock where is sheltered and easily available to me throughout the night but has the added advantage of being a soft mass to hit if I ever fell. I have never ever fallen.


If there really are no trees or anchor points then you are pretty stuffed with just a hammock and quilts ... but ... you usually know where you are heading before you get there and that sort of unpleasant surprise can mostly be avoided. If I know there is a chance I won't be able to hammock in the middle of a multi-day trip then I simply add an inflatable sleeping mat to my kit and I can sleep on the floor underneath the tarp, using it set up like a tent! This is feeling like another 'pro'!!

A definite disadvantage of the hammock and tarp is their construction from lightweight, ripstop nylon or polyester. For most aspects of camping these materials are the best choice except for when there is a fire anywhere nearby as the embers rising from the fire, as tiny as they may be, begin to drop as they lost heat but still have enough to melt holes in the tarp, hammock and underquilt. If I am planning a campfire then I have to strongly consider whether I risk taking my hammock kit too.

That said; I do love hammock camping ... and I guarantee that once you try it ... you will too!!

The Whelen Lean-to:

In 1925 the accomplished American outdoorsman, Townsend Whelen, had developed a design for a 'hunters lean-to tent' and presented it to Abercrombie and Fitch who began to produce and market it. The 'Whelen Lean', as it is now better known, is constructed from mid-weight canvas or oilskin and comprises a large square back wall with triangle sidewall at each end, plus a short porch roof complete with sidewalls that creates a weather shield instead of a second, tent-like, side. Modern canvas treatments make the Lean-to a slightly heavier affair to carry but it's water- and weatherproofing is second to none.


My friend Ollie bought his Whelen Lean after seeing the Baker Tent and Whelen Lean to belonging to (and made by) Steven Le Say of Axe & Paddle Bushcraft. As soon as I saw Ollie's, and experienced the smell of every campfire it has had before it, I had to have one too! Mine was made for me by Angelika of Wild Canvas (now the Red Tent Company) in a rather subdued green waterproof and rotproof canvas.


So, knowing now that I don't favour ground camping unless it is absolutely unavoidable ... why do I love my Whelen? I don't entirely know ... but it has a lot going for it!

Pro's

The Whelen Lean-to shares a strength of the hammock in terms of its exposure to, and view of, the nature and environment around it. It has superb weather protection and is made from materials that really don't mind (or impact your kit and experience) if they are wet or dry ... in fact this is so true that Ollie keeps his Whelen rolled up and simply wedged into the front of his canoe! It is super-simple to put up and takes very little time at all, with it not really mattering about the canvas or rope being on wet ground as you do so. Eight tent pegs, 4 guylines (left attached to the shelter all the time) and a trio of poles (or saw to cut them in-situ) is all that is needed to create a really solid shelter.

When pitching the Whelen it is possible to suspend it on a rope between two trees / anchors or, where there are none available, it can be pitched freestanding by using three poles together with its guy-lines. As it is being set-up, the Lean-to can be adjusted to give height enough to stand up in with a narrower sleeping space or a lower height but much wider footprint giving greater protection from driving rain. The front porch can be tightened down as the weather dictates or it can be raised by using a branch or canoe paddle to increase the light and widen the footprint it covers.


It is a marvellously social affair; whether with two of you sharing the space, sat under its surprisingly effective shelter or with two (or more) shelters set up facing each other and a campfire between them. Greater than this social aspect is the unavoidable connection the canvas and woodsmoke creates with the outsdoorsmen, the Voyageurs, mountain men and intrepid women who camped in the same way all over the North America wilderness in the 19th Century.

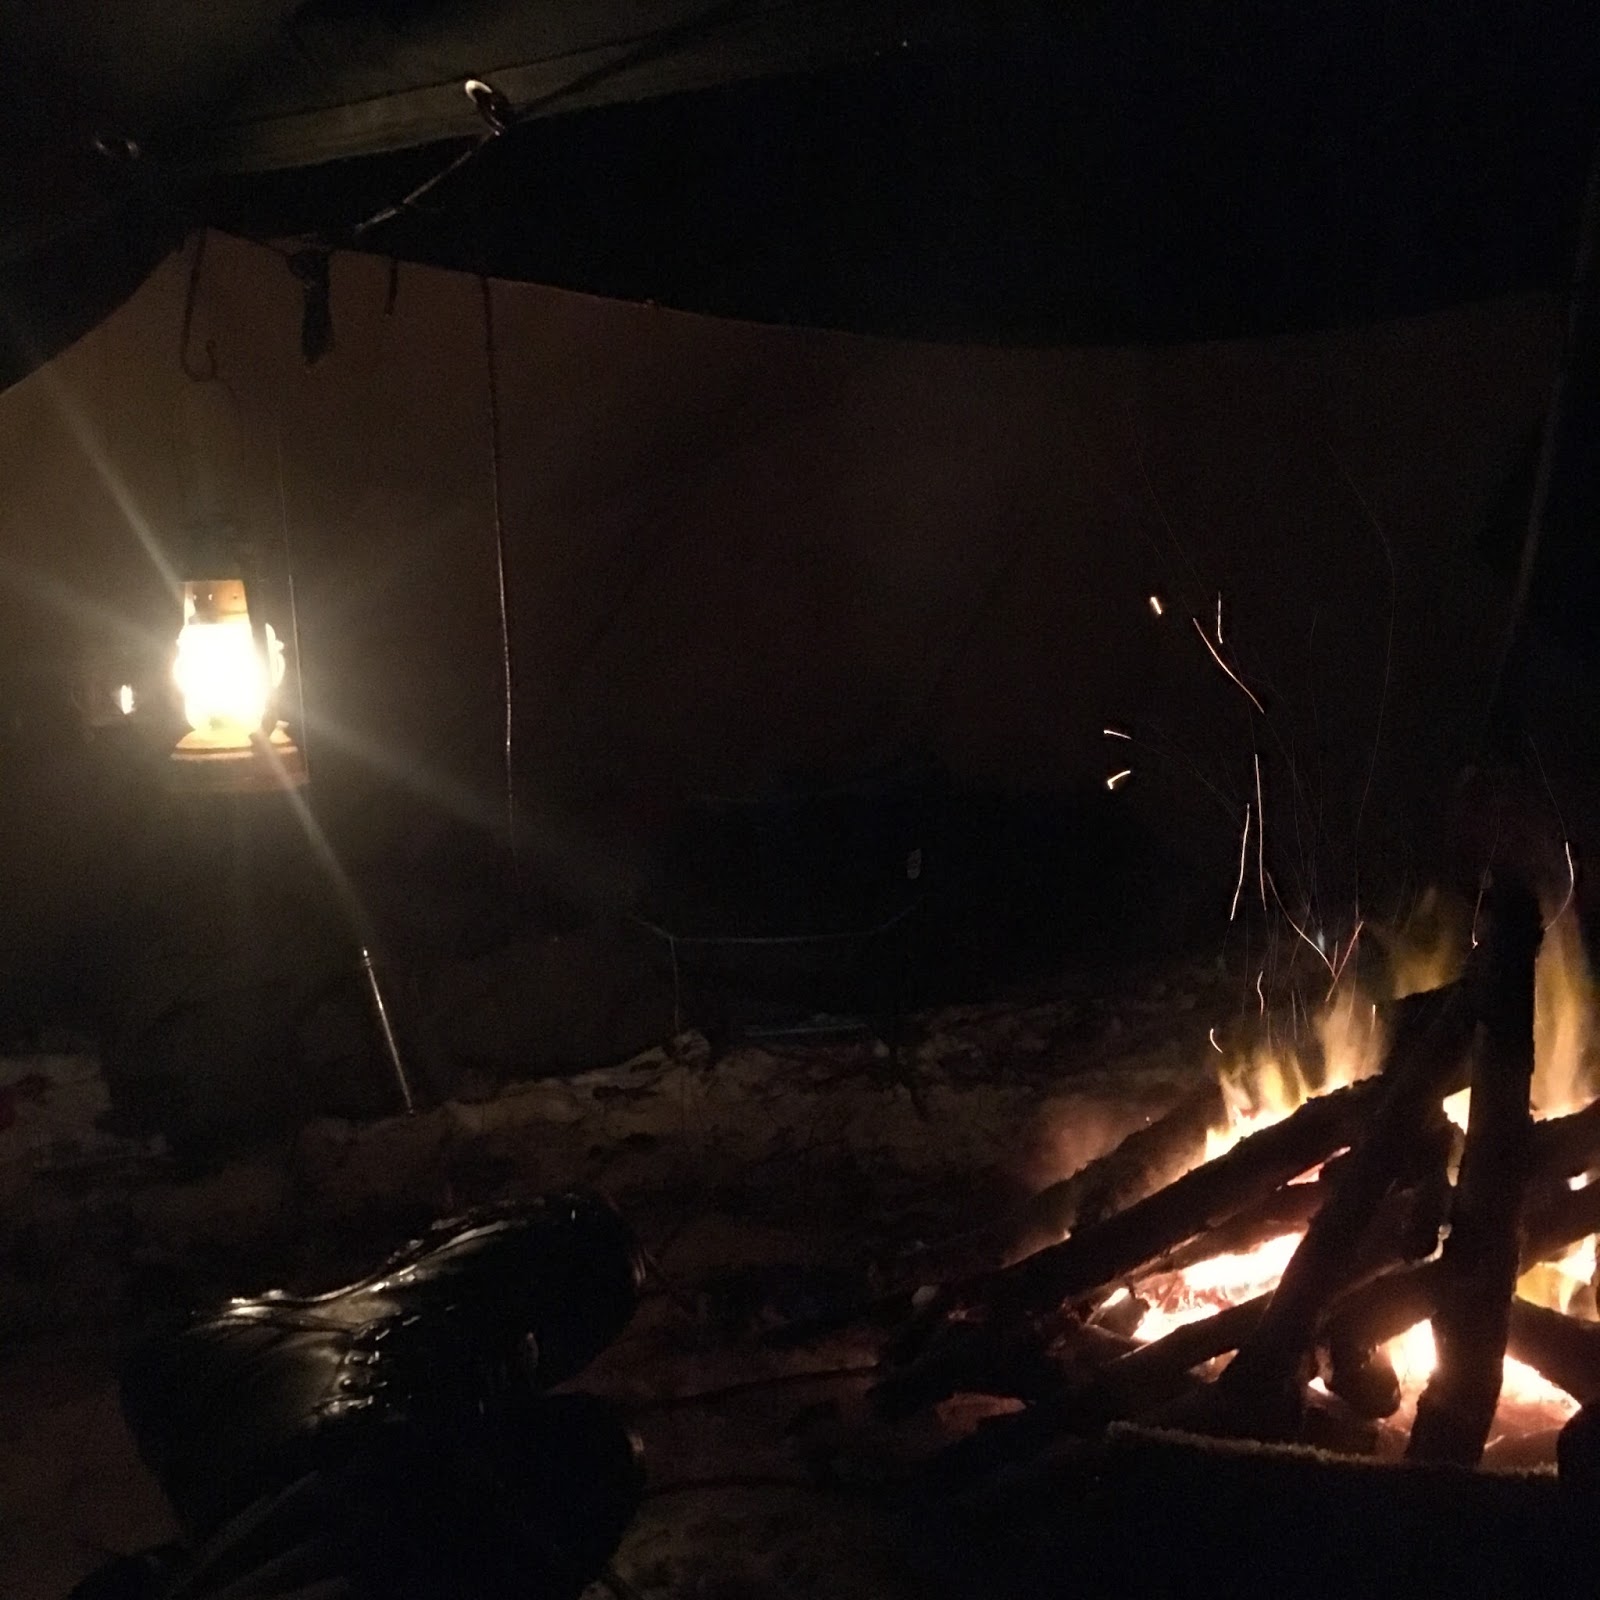
Perhaps the biggest 'pro' of the Whelen Lean-to is the way its design catches the heat of a campfire ... although this may also be a weakness as it really needs a fire to viably camp in colder weather. With a well constructed fire at the front of the shelter, the smoke rises away while the heat is reflected by the rear wall and captured in the roof space and porch filling the tent with warmth that lasts for hours after the fire has died down. On our canoe trip last week we camped in the snow at roughly 0 degrees Centigrade and the heat from the fire remained in my Whelen from 11pm when I fell asleep until 4am when I woke briefly, tucked myself in and fell asleep again!

Cons

My Whelen (and I imagine all others) are pretty heavy bits of kit. The canvas plus the guylines, pegs etc make it a fairly big package to carry and it certainly isn't lightweight or backpackable with much else in your rucksack! There is no protection from the ground which requires another groundsheet to lie under your sleeping bag and sleeping mat.

I worry about embers from the fire damaging my more modern camping materials (like my nylon sleeping bag or a bivvy bag) so I use a separate canvas sheet as a cowboy-style bedroll which envelopes my sleeping bag and mat although I will soon be upgrading this arrangement to a purpose made canvas bedroll made from the same water-, fire- and rotproof canvas as the Whelen.

The Whelen Lean-to is not the most campsite friendly option ... even though it can be set-up with poles rather than trees, the need for a fire can be a drawback on many sites and the lack of privacy and security is definitely a limitation. For the backcountry and wild camping though, it is absolutely perfect!


My Verdict

The options for camping are all 'horses for courses' and each has advantages and limitations that the another doesn't ... but I definitely have my favourites!

Most of my camping will continue to be with my hammocks, I just find it so comfortable, so convenient and so adaptable. I have slept in sub-zero temperatures and I have hung off canoe trailers ... what I have never ever had is a bad nights sleep in a hammock, unless the tossing and turning, dead arm and sweatiness of sleeping, trapped in a sleeping bag, on the ground!

The Whelen Lean-to is my new 'go to' shelter for bushcraft and wild camping trips where I know I can have a fire each night. It gives so many of the strengths of hammock camping but with a more useful sheltered space underneath for camp tasks like creating a fire with bowdrill or for campfire cooking. In time my canvas bedroll will be tweaked and will probably just use woollen blankets which are more spacious and versatile (although bigger and heavier) than my sleeping bag and I just feel the whole set up is more robust for a woodland, bushcraft outing.

I don't think anything will entirely replace hammock camping, for me, as the pinnacle of comfort outdoors ... but to prove it I run regular CampCraft and Bushcraft days (and expeditions) where you can try the hammock and Whelen for yourself! Get in touch through the Blog, Facebook or email at a4adventure@hotmail.co.uk

Tuesday 26 December 2017

A winter canoe trip and camp on the River Usk - a4adventure.com

Last year I had the great idea of taking an Open Canoe down the entire length of the river Usk in South Wales but circumstances and life conspired against me and it was another 12 months before I would have the time to try the descent ... sadly, this time I lost out on paddling with my friend Nick as our diaries didn't quite match up but Ollie and I both had a week free and nothing could stop us.

... except the weather!

The week before we set off the snow began to fall and the night before we left for our start point at Sennybridge the snow became so deep that the roads were impassable past Brecon and from Hereford (where the intrepid Ollie had to drive from)! Our trip was immediately delayed by a day and we went to bed hoping for a break in the snow just long enough to allow the roads to be cleared for us to get to our start point!

Tuesday dawned bright, clear but cold and tentatively Ollie ventured out from Hereford and down to Usk to collect my canoe and I. The roads were awful from Hereford to Abergavenny (and Ollie was caught behind a Highways Agency Discovery that had rolled off the a465 for an hour) but it was clear down to Usk and we had a straight run up to Talybont on Usk where I had to make the most influential decision of our trip, before it had even begun ... did we push on to Sennybridge or did we start at Talybont and avoid the worsening weather??

We decided to push on to Sennybridge and made it to the put-on by 11am where we unloaded in the gently falling snow and hoped for the best.


The river was pretty low at only 0.88cm and was interrupted unfairly regularly by fallen trees blocking the whole channel. The first three drops on the section were too shallow to be paddled in fully laden canoes which left us with some interesting lining combined with brave leaps into canoes as they floated beneath the waterfalls but we managed to descend without too much delay.

As we bobbled down towards Aberbran (between Sennybridge and Brecon) Ollie suddenly went very still and very quiet, reacting quite aggressively to me shouting 'what's up Bud'? It turned out, as I paddled down to him, that he had seen three otters playing along the bank before slipping back into the river as he drifted along with the current. I was only lucky enough to see the bubbles breaking on the surface as one of these otters made its way through the current  and beneath a fallen tree for shelter but Ollie had seen the whole of the moment as the three cavorted and carried on in the snow!

We stopped at Aberbran and enjoyed a lunch on the gravel beach ... by which I mean, we hopped from frozen foot to frozen foot as we wedged a pasty into our mouths, helped down by lukewarm Thermos's of tea! We had made good time to Aberbran and our discussion was focussed on how far past Brecon we would manage before dark at 4pm.


From Aberbran we followed the line of the river as it wandered between boulders and rapids until we reached a beautiful section of still water bounded by snow covered trees and we began to discuss our options for the evening. We were both carrying Whelen Lean-to Tents which really needed a number of trees to give the best chances of pitching although, as Ollie was happy to point out, one of the tents had been supplied with poles so 'he was alright, Jack!!'. I was absolutely sure that we could smash through Brecon that afternoon and make camp below on one of the gravel beaches ... but I was also absolutely sure that we should never give up a perfect campsite, too soon, for a weaker campsite at the end of the day. Logic won out and we decided to stop in a secluded piece of woodland with ample space for out tents as well as firewood to keep us warm.


It didn't take us long to set the Whelen Tents up and we focussed on collecting a good load of fallen dead-wood for our fire. The Whelen's work best with a fire that radiates into the sheltered space creating a trapped warmth that lasts through the night and we harvested plenty of fallen birch, pine, beech and ash to create the heat we needed.


Changing out of drysuit and into my favoured Tilak smock we managed to spend the net few hours cooking sausage and eggs, drinking whiskey and discussing the pro's and con's of my ventile smock compared to Ollie's Fjallraven G1000 waxed cotton smock. Dusk became dark, dark became cold and we began to snuggle into our canvas bedrolls and woollen blankets.


Then the unthinkable happened ... the temperature rose and the snow began to melt, with huge chunks sliding off the branches above us and exploding on our canvas shelters as if we were being mortar-bombed!

The night passed without harm or incident but the delivery of snow to ground level had been frequent and when we finally woke at 8am our first thoughts were about high the river had risen

Ollie was first up, and tending to the fire, and he asked me how high I thought the river might have risen ... about 20cm seemed fair to me, but so did staying in bed all day too ... Ollie thought a little more but it wasn't until we logged onto the 'river levels' website that we realised the river Usk had risen from 0.88cm to 1.60 overnight! We breakfasted and broke camp but realised the seriousness of the paddle ahead of us as we struggled to launch the canoes into the fast-flowing brown flood waters.

Adding the the sense of adventure I realised that I had worn contact lenses on our first day and had forgotten to bring replacements or glasses for the rest of the trip. I was forced to surrender trust and control to Ollie as I simply couldn't see the hazards far enough in advance to make the best decision for passing them ... I mean, I wasn't going to die, but I certainly wasn't going to be the first to spot the way past a fallen tree until we were upon it. Roles agreed, we spun our canoes into the current and paddled on.


The next sections were bouncy and exciting as we paddled to Brecon, portaged by sledging our canoes across the golf course (never to be repeated in the dry!), and continued to Brynich Lock and Millbrook Falls. The river was continuing to rise from 1.60m to 1.80m as we paddled and I couldn't help but remember December of last year when the river was only at 0.76m on this section and I was having to work hard to cross from boulder to boulder, picking my way along the best of the flow to travel through the scrappy shallows of the river. This year we simply barrelled through the sections, big volumes of water hurtling us over the rapids and down into the braids between Brecon and Talybont-on-Usk.

As we paddled through the maze of braids at Scethrog the weather took a turn for the malevolent and heavy winter showers blasted us with rain, sleet and hail. The river continued to rise past 2.00m and, although the volume of water was helping us cover decent distance, the size of the river was now forcing to consider the sections that lay ahead of us.


The river continued to rise with snow-melt and rainfall as we paddled towards Llangynidr and we realised that we had a decision to make ... should we stop above Mill Falls and be cowards or should we carry on to almost certain trouble? Ollie was paddling a Mad River Explorer 14 while I paddled a Venture Prospector 16 and we were both aware that we would struggle to rescue each other, without losing equipment, if the canoes were to swamp or capsize in the Grade 3 waters below us.

We paused in an eddy and discussed the situation but it was already futile. The reality was clear. The river was now at 2.20m and there was very little chance that we could paddle the next few kilometres of Grade 3 river at this level without swamping the canoes. That was it, decision made, we would have to stop at the Llandetty Monitoring Station and call for a lift from my wife.

It sucked. It felt like failure. It felt like quitting.

As we pulled the canoes from the water a massive squall hit us, forcing us to leave the boats on the waters edge and seek shelter from the ferocious winds and hail that lashed down upon us. I had pulled my canoe about two-thirds of the way up the bank but the sudden winds threw it back into the river and Ollie and I had to race to grab the painter before my kit was bucked into the racing river. This was a sign, we had to stop.


As the storm weakened we pulled the canoes up to the roadside but the sense of quitting and failure still took precedence in our minds and conversation as we waited for my wife to collect us. It wasn't until very shortly later that we drove over the river at Llangynidr and saw the full extent of the river, no running at 2.50m and still rising, that we knew we could not have descended the next 6km of Grade 3 rapids, stoppers and waterfalls without swamping the canoes. Last week a kayaker died on the river Dart and it would have been both foolhardy and inexcusable to push our luck in expedition laden canoes ... even though we both knew we could paddle the section in different times, even at the same levels.


It was a tough decision but the right decision.

I was bothered afterwards by the thought that I had forced us to start from Sennybridge rather than Talybont and that a lower start might have seen us complete more of the river descent. It didn't take long for me to realise though that there really are no bad decisions in life ... just how you deal with them. We had failed to complete the whole river as we had hoped, over 5 days, that we would; but we saw the most incredible winter wonderland as we paddled through the snow, we logged a number of fallen trees that posed a hazard to other paddlers, we saw three otters loving the snow, we had a perfect camp in the wintery conditions and we bounced our way through two sections of river in half a day before wisely stopping before we got hurt.

An old man once said to me: 'know your limits and stay within them' ... and I think we did this time!

You can see the whole trip in the following video:


Wednesday 19 July 2017

Coastal Canoe Adventure - Solva - June 2017

Three clients and I met at Solva on the Pembrokeshire coast where the canoes and safety kit was already waiting on the harbour slipway.

Following us 'kitting up' and a short safety briefing we set off into the harbour, starting a coaching session which developed the clients confidence and ability in controlling the canoes (and which also enabled me to assess their skill and capabilities in order to plan the length and challenge of the afternoons coastal journey).


Much fun was had within the harbour, working as pairs in the canoes to turn the craft plus forwards paddling, reversing and stopping as well as playing a number of games and challenges designed to develop and consolidate the skills each paddler had. Only once each client was happy with their competent paddling did we turn our sights to the sea and the real adventure of coastal canoeing!


Leaving the harbour we headed along the coastline staying outside the zone of the small swell waves impacting on the cliffs as the group settled into a rhythm and got used to the rise and fall of the swell. Within a very short time indeed we had seen a large seal who was curious about our small flotilla and surfaced around us sporadically for the next few minutes as we gawped and marvelled at it, excitedly pointing and trying to find cameras as it did so.

The wind was rather against us as we paddled and a short paddle back towards the harbour convinced the group that passing around the next headland would have made for some very serious and committing paddling on the return journey. This fact didn't dampen the adventure though and we began to explore the gullies and caves of the rocky coastline as we scouted for a sheltered spot for our lunch.


Landing should have been a swift and easy affair but we got rather distracted by a row of buoys in a sheltered bay and time was happily wasted as we pulled up a large lobster pot to discover a fine crop of spider crabs waiting for the fisherman to collect. These are a delicacy on the Continent but we rarely eat them in the UK ... I'm not one for seafood though so I didn't feel I was really missing out!


Refreshments taken care of we resumed our paddling, heading out past the rocky guardian of the harbour and across to the jagged teeth of rocks breaking the surface as the waves rose and fell. Working hard within each canoe we began setting challenges between the pairs as each craft threaded its way between the rocks, using the incoming swell to push through the channels between rocks and walls.


Time had passed rapidly as we were out exploring and in no time it was 4pm so we headed back into the harbour, paddling up past the moored yachts and back to the slipway ... which is conveniently close to both pubs and cafes (I'll let you guess which one we chose to have our debrief in!).

Our next Coastal Canoe Adventure is in Pembrokeshire on August 12th then August 13th 

followed by trips in Anglesey on August 16th then 17th


Email us now at a4adventure@hotmail.co.uk for more information and to book your place!


Trip Report: Town Drain and White Lady Cave in the Nedd Valley

Whilst we were exploring the Nedd Valley we decided to rig ropes and explore the lower section of the canyon, including a trip into the difficult-to-pinpoint Town Drain and the impressively wet White Lady cave.

Reaching these caves was harder work and more unpleasant than the actual trips themselves but a knowledge of ropework and setting anchors is very definitely needed in order to ease the return back up the slippery rocks and into the canyon.

Town Drain is accessed by one of three rifts in the rock face and the short passages join together, leading into one phreatic tube lined with the most fantastic scallops showing the speed and direction of the high-pressure water that flowed through and formed the cave. The main passage twists and turns and the cave heads deeper into the hillside, heading for the Little Neath River cave system that lurks behind it, with some amazing water-worn rock features to negotiate and explore! Moving around a number of corners the cave becomes lower and the floor increasingly covered by loose boulders and pebbles which make crawling quite unpleasant. The unpleasantness continues until the cave becomes more and more muddy and shows evidence of the flood debris washed in during the winter spates.


White Lady Cave has a more larger and more obvious entrance but this is guarded by deeper water which is cold enough to deter most, even in the summertime! With a certain sense of masochism we waded through the first test and climbed the slippery rocks into the impressively large interior chamber. 

The flowstone and calcite features are really quite impressive within the cave passage although they were somewhat overshadowed by the sudden presence of the deepwater sump (which is often cave dived by specialists).

Our return journey led us up into the upper series which held a series of ever-increasingly captivating flowstone features and gour pools which ranged in size from centimetres to metres in size! The price for seeing this amazing display of geology came in the form of 'the lake' which is a deeper, colder and more committing water crossing, involving a duck underneath a rocky rib separating the passage into two chambers at head height! Trapped within this water was a remarkably calm Bullhead fish who seemed to rather enjoy having his photograph taken!


Tuesday 18 July 2017

Trip Report: Bridge Cave in the Nedd Valley

Caving isn't my natural sport; I haven't the body shape for tight spaces and I haven't the desire to find contortionist ways to push my bulk through 'squeezes', 'chokes' and 'rifts' ... however ... I do see the appeal of caving and I can't quite keep myself away from it!

I can totally understand why people are drawn to exploring the bizarre and incredible passages left by water cascading underground many thousands of years ago and are attracted by the truly breathtaking formations that are to be found in the harder-to-reach corners of the 'underworld'. I can also understand the need (the addictive searching) for new, undiscovered cave passages; but it is this exploration that also causes me the most stress. I simply do not like the experience of first wandering down a dark passage and not knowing where, or if, it goes. My second or third trip into a cave is usually made with a pretty laid back confidence but the first trip into any unknown cave always pushes me between 'stretch' and 'panic'!

It is this last point that confuses me the most. I can be pretty well gripped with fear of the unknown, fear of becoming physically trapped, fear of being lost or trapped underground and yet I also feel the draw of finding a new space that has never before been seen by human eyes. Take the image below, I spent long minutes simply lying in the narrow rocky passage looking through the natural rock window into a secret, hidden, world ... imaging what must be around the back of the pillars ... marvelling that no one has ever seen around that corner (as it is far to small to be accessed and, even if it were big enough, to crawl through the pool and pillars would be to disturb something of incredible beauty and I suspect that is an obstacle far greater than physical space!!).

(looking into unreachable cave in the upper series)

Anyhow, as all good stories begin at the beginning, let us go back a few steps and start properly! 

Five of us set out to explore the Nedd Valley in South Wales, aiming to visit three of caves that I will need to be put onto my Cave Leader 'ticket' when I finally get brave enough to face my assessment. We were lead by the indomitable Sean who is caving-crazy at the moment as he builds up to his assessment and will be qualified well before me!

Starting with Bridge Cave; we set off down the 60m crawl passage towards the boulder choke which is precariously protected by pieces of wood and scaffold pole, looking dubious enough to reinforce the advice to stay well away from disturbing the boulders as you wriggle through!


Luckily the boulder choke doesn't look so threatening from the passageway and we all slid through slowly but without too much difficulty - it is only when you return that you notice the 1960's wooden posts and scaffold poles which have been braced between the shifting boulders and the cave sides!

The long crawl gave way to a wonderful stream passageway that allows you to walk fully upright as it meanders left and right, leading into the enormous main cavern of the cave. Stood at this entrance it is hard to take in the full size and scale of the underground void and it was only when we began exploring a side passage and waterfall within the cave that we began to appreciate the full scale of the chamber.

Moving through the length of the cave I was busy taking a photo' when I noticed the stone bridge high above us (which gives the cave its name). It is a staggering sight and worth the long, painful crawl to reach. The sights were only just beginning though and some careful rope work and rigging led us to the upper series and the most fantastic views of the bridge as well as the flowstone formations and stone pillar that guard it:


Back at floor-level we made our way further into the back of the cave to visit the sump that leads (after 11m of nerve-wracking cave diving, I assume) into the Little Neath River Cave. The sump isn't much to look at except dark water under a low rocky ceiling, but the flowstone and calcite formations that adorn the walls of this sump passage were amazing:


We spent around 3 hours in the cave exploring and filming. Most of this time was spent in a childish state of wonderment at the incredible beauty of formations and water-worn features that had taken thousands of years to form ... seemingly just for our enjoyment! The need to protect and conserve the cave environment and these magical formations was powerfully apparent.

The exit from the cave was as long as before, yet it didn't seem quite so hard this time. I wasn't happy on the trip into the cave but couldn't help deciding that such beautiful formations deserved such challenging access in order that each caver really 'earns' the privilege of seeing them.

(Bi-valve fossils in the entrance passageway)

Thursday 1 August 2013

Activities: Rock Climbing in South Wales

What could be finer than following a crack-line up a rock face with the sun on your back, the rock feeling secure and warm under your fingers; stepping upwards with confidence as you follow the route you picked out before leaving the ground?

Whether you are a beginner seeking an introduction to climbing and the equipment used, are organising a birthday party and are focused more upon challenge, adrenaline and fun or are a much more experienced climber looking for coaching and guidance on your performance and techniques a4adventure has the experienced and qualified instructors, together with carefully chosen crags and variety of rock types, to provide exactly the experience you want.


Each of the locations we use has been carefully evaluated and risk assessed by our team of instructors so that we have the widest range of activities and opportunities to safely fulfil your objectives for the day.


Tell us what you want and we will organise the best place to achieve it - small, quiet crags; large outcrops with plenty of graded routes, sea cliffs or abseils into caves!


We prefer climbing on real rock and normally use outdoor crags and outcrops, however, we also have excellent partnerships with a number of indoor climbing facilities and can provide the highest quality experience for you whatever the weather.


Hen and Stag Do's ... Birthday parties ... Family days ... Team Building and Group Bonding exercises ... Charity Abseils ...

... email us at a4adventure@hotmail.co.uk and let us design your activity day now.

a4adventure is back!!

a4adventure has dusted itself off and emerged to defend its position as the highest quality provider of outdoor activities in South Wales ... and all our client feedback says this is true!

In order to reboot the business the a4adventure staff have reviewed the activities we offer, focussed our provision to meet the requirements of our market and renewed every single piece of equipment - from buoyancy aids to team building kit ... and everything in between.

For example, gone are the hideously uncomfortable DMM Alpine climbing harnesses so common with outdoor activity providers and instead a4adventure now offers rock climbing and abseiling using the supremely comfortable Petzl Corax harnesses and Petzl Elios helmets. We offer a range of climbing experiences at one of several crags throughout South Wales and will design the day to meet your needs, skills and requirements.


Gone are the Palm AP2000 watersports helmets and instead we now use the NKE Bumper helmets, with its market-leading adjustment, together with Yak Kallista buoyancy aids which make coasteering and gorge walking activities safe, comfortable and achievable for all whilst maintaining the highest levels of safety for our clients.


Our stocks of teambuilding equipment have been specifically procured to enable delivery of deliberately designed team building, leadership and initiative challenges to groups from 2 to 100 in size; and our bushcraft stores have been renewed, repackaged and organised to deliver outdoor shelter building and cooking whatever the season.

It isn't just our equipment stores that have been overhauled, our Land Rover Defender 110 County Station Wagon has undergone a small transformation too:


Keep an eye out for us as we head in pursuit of adventure in Wales and beyond!

www.a4adventure.com